Steps to Success: Before the Event
STEP 1
Create a supplies budget and funding plan.
The Community Coordinator, Event Coordinator, and Collection Coordinator will work together to determine the total costs of the event. Depending on your community, you may be able to obtain in-kind donations from members of the Project Team and their affiliate organizations. Download and review this sample Event Budget and Template to use as a guide in your planning.
The three Coordinators will need to identify funding sources for all of the budgeted expenses. With several partner organizations in the community, each can contribute a small amount and together cover the costs.
Consider these sources of funding for your event:
- In-kind donations (from Project Team organizations and/or local businesses)
- Equipment loans
- Your Project Team may be able to borrow equipment from Project Team member organizations. Local businesses or educational institutions may also offer equipment loans or rentals. Some libraries have digitization kits that you can borrow.
- Small grants from local banks and private foundations
- State library association/library network/library hub
- State humanities councils
- State and local arts and cultural councils
- Inclusion in annual budget plans of Project Team organizations
STEP 2
Select a date and time for the event.
The Community Coordinator, Event Coordinator, and Collection Coordinator will work together to choose when to hold the event. The season, month, day, and time must meet the needs of the community, and specifically:
- not conflict with major religious or other holidays for cultural groups in the community;
- present minimal conflicts with work and family commitments of community members;
- not conflict with other major community events (Be sure to check town and community calendars.);
- be a time when the community can gather without potential weather events (i.e., snow storms or hurricanes) that could prevent maximum attendance; and
- work best for most community members.
Once you’ve chosen some potential dates, identify a start and end time for your event. Participatory archiving events are generally held in an open-house format. The RoPA Developers recommend a half- or full-day window in which Contributors can drop in to share their items for about 30-60 minutes. For example, Mass. Memories Road Show events are usually held on weekend days from 10:00 a.m. to 2:00 or 3:00 p.m. Culture in Transit events are held for about 3 hours after normal business hours during the work week or during the day on weekends.
Remember to consider inclusivity in setting the start and end times. Having a larger window allows for individuals who are busy during one part of the day to attend during another part of the day.
If you are planning on holding multiple events, consider holding them on different days and at different times. For example, one event could be during a weekday evening and another on a weekend morning.
STEP 3
Select a Location.

The Eastham Mass. Memories Road Show in 2017 was held in a function room at the Eastham Public Library. This photograph shows the room layout for that event.
The Community Coordinator, Event Coordinator, and Collection Coordinator will work together to choose where to hold the event. Typical locations include: community centers, libraries, high school auditoriums, gyms, or cafeterias. A suitable venue will be:
- commonly used by members of the community;
- a place where all community members feel welcome and comfortable;
- centrally located;
- neutral ground (a venue that is one community sub-group’s “turf” might be off-putting to members of another sub-group, i.e. teenagers at a Senior Center.);
- easily accessible via public transportation and/or have plenty of parking; and
- compliant with American Disabilities Act (ADA) guidelines.
Participatory archiving events are ideally held in a single large room where everyone can congregate and connect, orient themselves to the general flow of the stations, and view one another’s Items. For this reason, the event room should:
- have enough space (approximately 2,000 square feet) to arrange stations comfortably;
- accommodate your anticipated number of participants over the course of the day;
- include ample electrical outlets for the Copying Station;
- have furniture available on-site that can easily be moved around;
- have nearby public restrooms;
- have a nearby room that can be used as a break room for volunteers to have lunch and coffee; and
- have the ability to close off additional doors so that a single doorway serves as both the entrance and exit for Contributors.
Regardless of the location you select, there may be some community members who need assistance getting to the event. Your Project Team may want to consider arranging transportation to the event location for these individuals and/or groups. For additional information about providing Transportation, see the Best Practice Examples in this module.
STEP 4
Create the Event Floor Plan for your event.
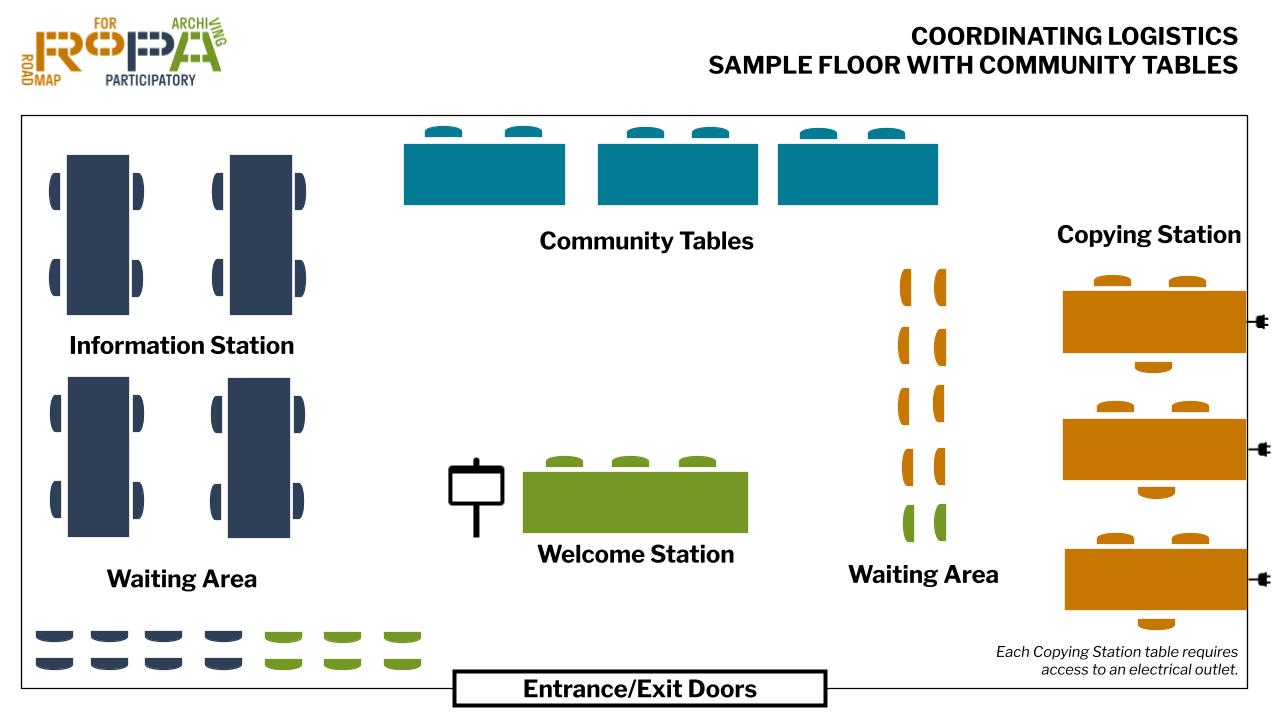
Sample Event Floor Plan
On the day of your event, Contributors will be guided through a minimum of three stations to create the collection: the Welcome Station, Information Station, and Copying Station. If your Project Team chooses to include Community Tables to enhance the understanding of the theme at the event, you will need to plan for an additional station area.
Organizing these stations strategically will allow you to facilitate a smooth, efficient experience for Contributors. The Event Coordinator will be responsible for arranging the stations in order and for drawing a floor plan to help the Project Team understand how to set up and how to guide Contributors between stations throughout the room.
Review these Sample Event Floor Plans and use them to guide you in the process.
When creating the floor plan, consider the following:
- Attention to overall flow;
- Space in between stations;
- The Welcome Station needs to be near the entrance/exit door. This placement allows the Welcome Station Volunteers to orient new Contributors to the event flow and helps ensure that Contributors are registered to participate prior to describing and copying their Items;
- The Information Station requires multiple tables with chairs allowing Information Station Volunteers to sit across from Contributors;
- The Copying Station requires multiple tables near a wall with electrical outlets to support laptops and scanners and, if your Project Team choose to project images of collected Items in real time, a wall to project upon;
- Plenty of seating for people to sit and fill out paperwork or wait their turn . The RoPA Developers recommend having 12-24 extra chairs available;
- A a place for people to catch up and just plain socialize with one another; and
- If your event has Community Tables, make sure they are visible and included in the main room when possible.
Your Project Team may decide to produce additional signs to identify and welcome Contributors outside the event location, near the entrance to the event room, or by the Welcome Station. Be sure to make a plan for this signage and, if you plan to place a sign in the event room, include it in the floor plan.
STEP 5
Develop a Numbering System to keep track of Contributors and their Items.
In the early planning stages of your event, it’s essential for the Collection Coordinator to develop a straightforward and simple numbering system to keep track of Contributors and their Items. This numbering system will allow you to connect the descriptions of the specific Items from Contributors to the digital versions of those Items copied at the event.
The RoPA Developers recommend using a specific numbering system, as outlined in the Numbering System Overview (download as MS Word or PDF document) handout. This Numbering System is used throughout RoPA and is explained in station-specific detail in the Obtaining Permissions, Describing Items, and Copying Items modules.
The Numbering System assigns every Item in the collection a unique Item ID Number consisting of three parts: a pre-assigned event number, followed by the Contributor’s event registration or nametag number, followed by the number of that particular item that the Descriptive Information Form describes (1, 2, 3, etc.).
The Event Number
The first section of the Item ID Number identifies the event number. Your Project Team may decide to host more than one event, and an event number is a way to differentiate between these events. You can pre-fill this section of the Event Registration and Permission Form since all the forms will be used at the same event. If this is a one-time event, you may decide to remove this section from the form.
The Contributor Number
The middle section of the Item ID Number is the Contributor’s unique identifier number. This number will be assigned at the Welcome Station on a Contributor’s nametag. Every Contributor at your event will be provided with a nametag that includes a unique registration number, which is described in the Obtaining Permissions module.
The Item Number
The final section of the Item ID Number is the number of the specific Item from the Contributor’s set of Items. A Contributor’s first Item is designated number 1, the second Item is number 2, and so on. Your Project Team may choose to limit the number of Items from a Contributor or allow an unlimited amount of contributions.
If the Project Team’s collecting organization has specific internal rules preventing the use of the RoPA Numbering System, the Collection Coordinator will need to revise the Event Registration and Permission Form, the Descriptive Information Form, the Event Registration and Permission Spreadsheet, and the Descriptive Information Spreadsheet.
STEP 6
Prepare for the Welcome Station.

Welcome Station volunteers at the Nahant Mass. Memories Road Show, 2017. Courtesy of Dalia Shilas.
The Welcome Station is where Contributors will complete the Event Registration and Permission Form. Contributors will be greeted by Welcome Station Volunteers who will describe the event and orient them to the other stations.
The Event Coordinator will work with the Collection Coordinator to designate the Welcome Station Captain.
For the Welcome Station, the Event Coordinator will need to procure:
- One 4-6’ table
- 2-3 chairs for Welcome Station Volunteers
- 8-10 chairs for Contributors
- Pre-numbered stick-on name tags for Contributors
- Copies of Event Registration and Permission Forms
- Approximately 100+ copies for larger events, 50-75 for smaller events
- Collection Coordinator will provide original
- Copies of the Understanding the Event Registration and Permission Form handout (download as MS Word or PDF document)
- Collection Coordinator will provide original
- Copies of the Copyright At Your Event handout (download as MS Word or PDF document)
- Collection Coordinator will provide original
- Clipboards
- Pens for signing forms
- Markers for name tags
- Document envelope
- A 8 1/2x11 station sign in plexiglass frame for the table (sample sign for you to modify, portrait, landscape)
- 4-6 Welcome Station Volunteers
- Translators and/or Sign Language Interpreters (optional)
STEP 7
Prepare for the Information Station.
The Information Station is where Contributors will complete the Descriptive Information Forms for the Items they plan to contribute to the collection.
The Event Coordinator will work with the Collection Coordinator to designate the Information Station Captain.
For the Information Station, the Event Coordinator will need to procure:
- 4-6 long tables (each table should be 6-8’ in length)
- 16-24 chairs for Contributors and Information Station Volunteers to sit across from one another
- Copies of the Descriptive Information Form
- You should plan to have at least three copies of the form for each Contributor, understanding that a Contributor will need one form per Item. Depending on how many Items you're planning to allow people to contribute at the event, you may want to make additional copies.
- Collection Coordinator will provide original
- Clipboards
- Pens
- Folders
- A 8 1/2x11 station sign in plexiglass frame for each table (sample sign for you to modify, portrait, landscape)
- 8-12 Information Station Volunteers for larger events (over 100 people) or 5-7 Information Station Volunteers for smaller events (fewer than 100 people)
STEP 8
Prepare for the Copying Station.
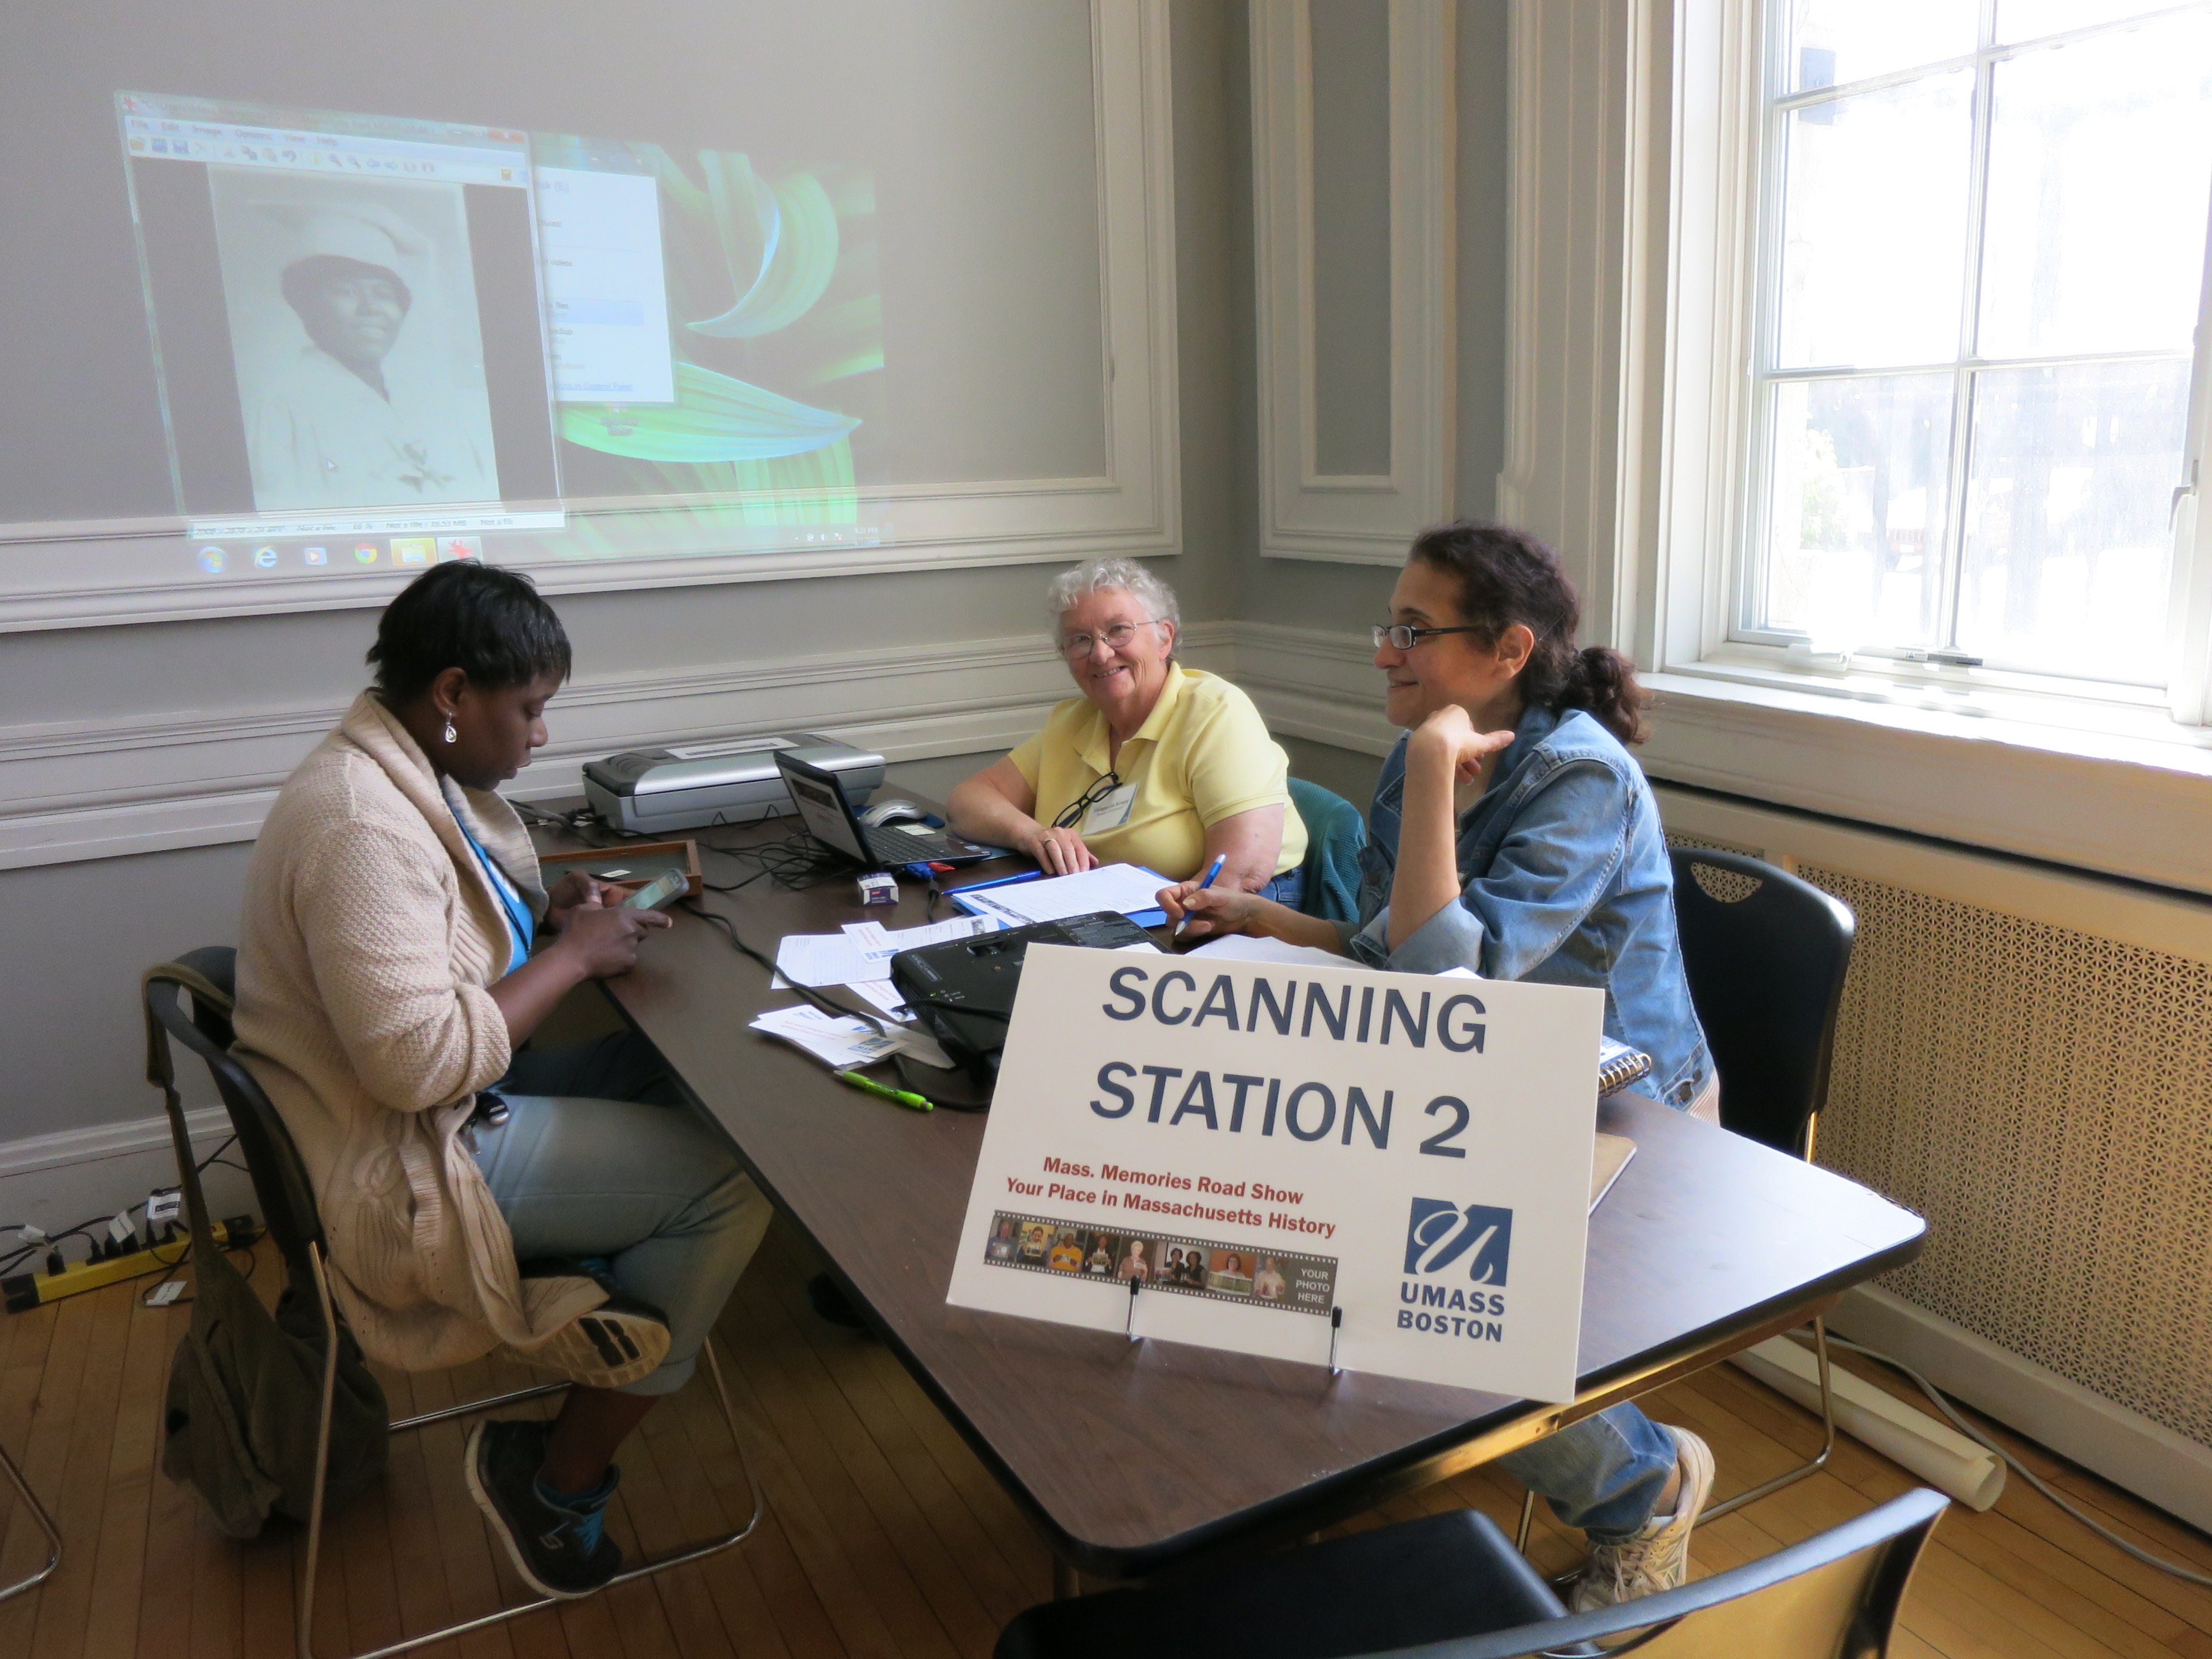
Scanning Station (also known as the Copying Station) at the Hyde Park (Boston) Mass. Memories Road Show, 2016
The Copying Station is where Contributors’ Items are copied and where the completed Descriptive Information Forms about those Items are collected.
The Event Coordinator will work with the Collection Coordinator to designate the Copying Station Captain.
For the Copying Station, the Event Coordinator will need to procure:
- Several extension cords and power strips
- 3 Copying Station tables
- 2 portable USB external hard drives
For each Copying Station table, the Event Coordinator will need to provide:
- Electrical outlet
- One 6-8’ table
- 3 chairs for Copying Station Volunteers and Contributors
- Laptop computer
- Laptop requirements include a USB port and a CD/DVD disk drive
- A PC is recommended as opposed to a Mac
- USB mouse and mousepad (this makes it easier to quickly navigate the laptop)
- Scanner and necessary drivers to connect scanners to laptops
- The RoPA Developers recommend each Copying Station table use the same style and brand of scanner for ease of training.
- You will need to install necessary drivers for connecting scanners to laptops.
- The RoPA Developers chose to provide directions and workflows using Epson Perfection V600 scanners because they are lightweight, portable, reliable, and inexpensive.
-
RoPA recommendations and guidelines for scanning equipment and software are available to download as an MS Excel file.
- LCD projector (optional should your Project Team decided to display Contributor Items in real time)
- Portable projection screen (or clean white/blank wall or other material to project onto)
- Document envelope
- Paperclips
- 8 1/2x11 station signs in plexiglass frame for each table (sample sign for you to modify, portrait, landscape)
- 2 Copying Station Volunteers
- 1 Item Copier and 1 Reviewer
STEP 9
Prepare for the Community Tables (optional).
Depending on the needs of your community and your Project Team’s decisions, you may choose to include Community Tables to enhance the understanding of the theme at the event. These tables could be used to feature local history resources, interpretive displays, brochures, fliers about community organizations, or anything else of importance to your community or the event theme.
The Event Coordinator will work with the Community Coordinator to determine what is needed for the Community Tables at the event and delegate a member of the Event Working Group to plan and volunteer at these tables. Many times, community partners will bring their own materials and staff and only need a space for displays.
STEP 10
Schedule and host an Event Orientation and Training Session.
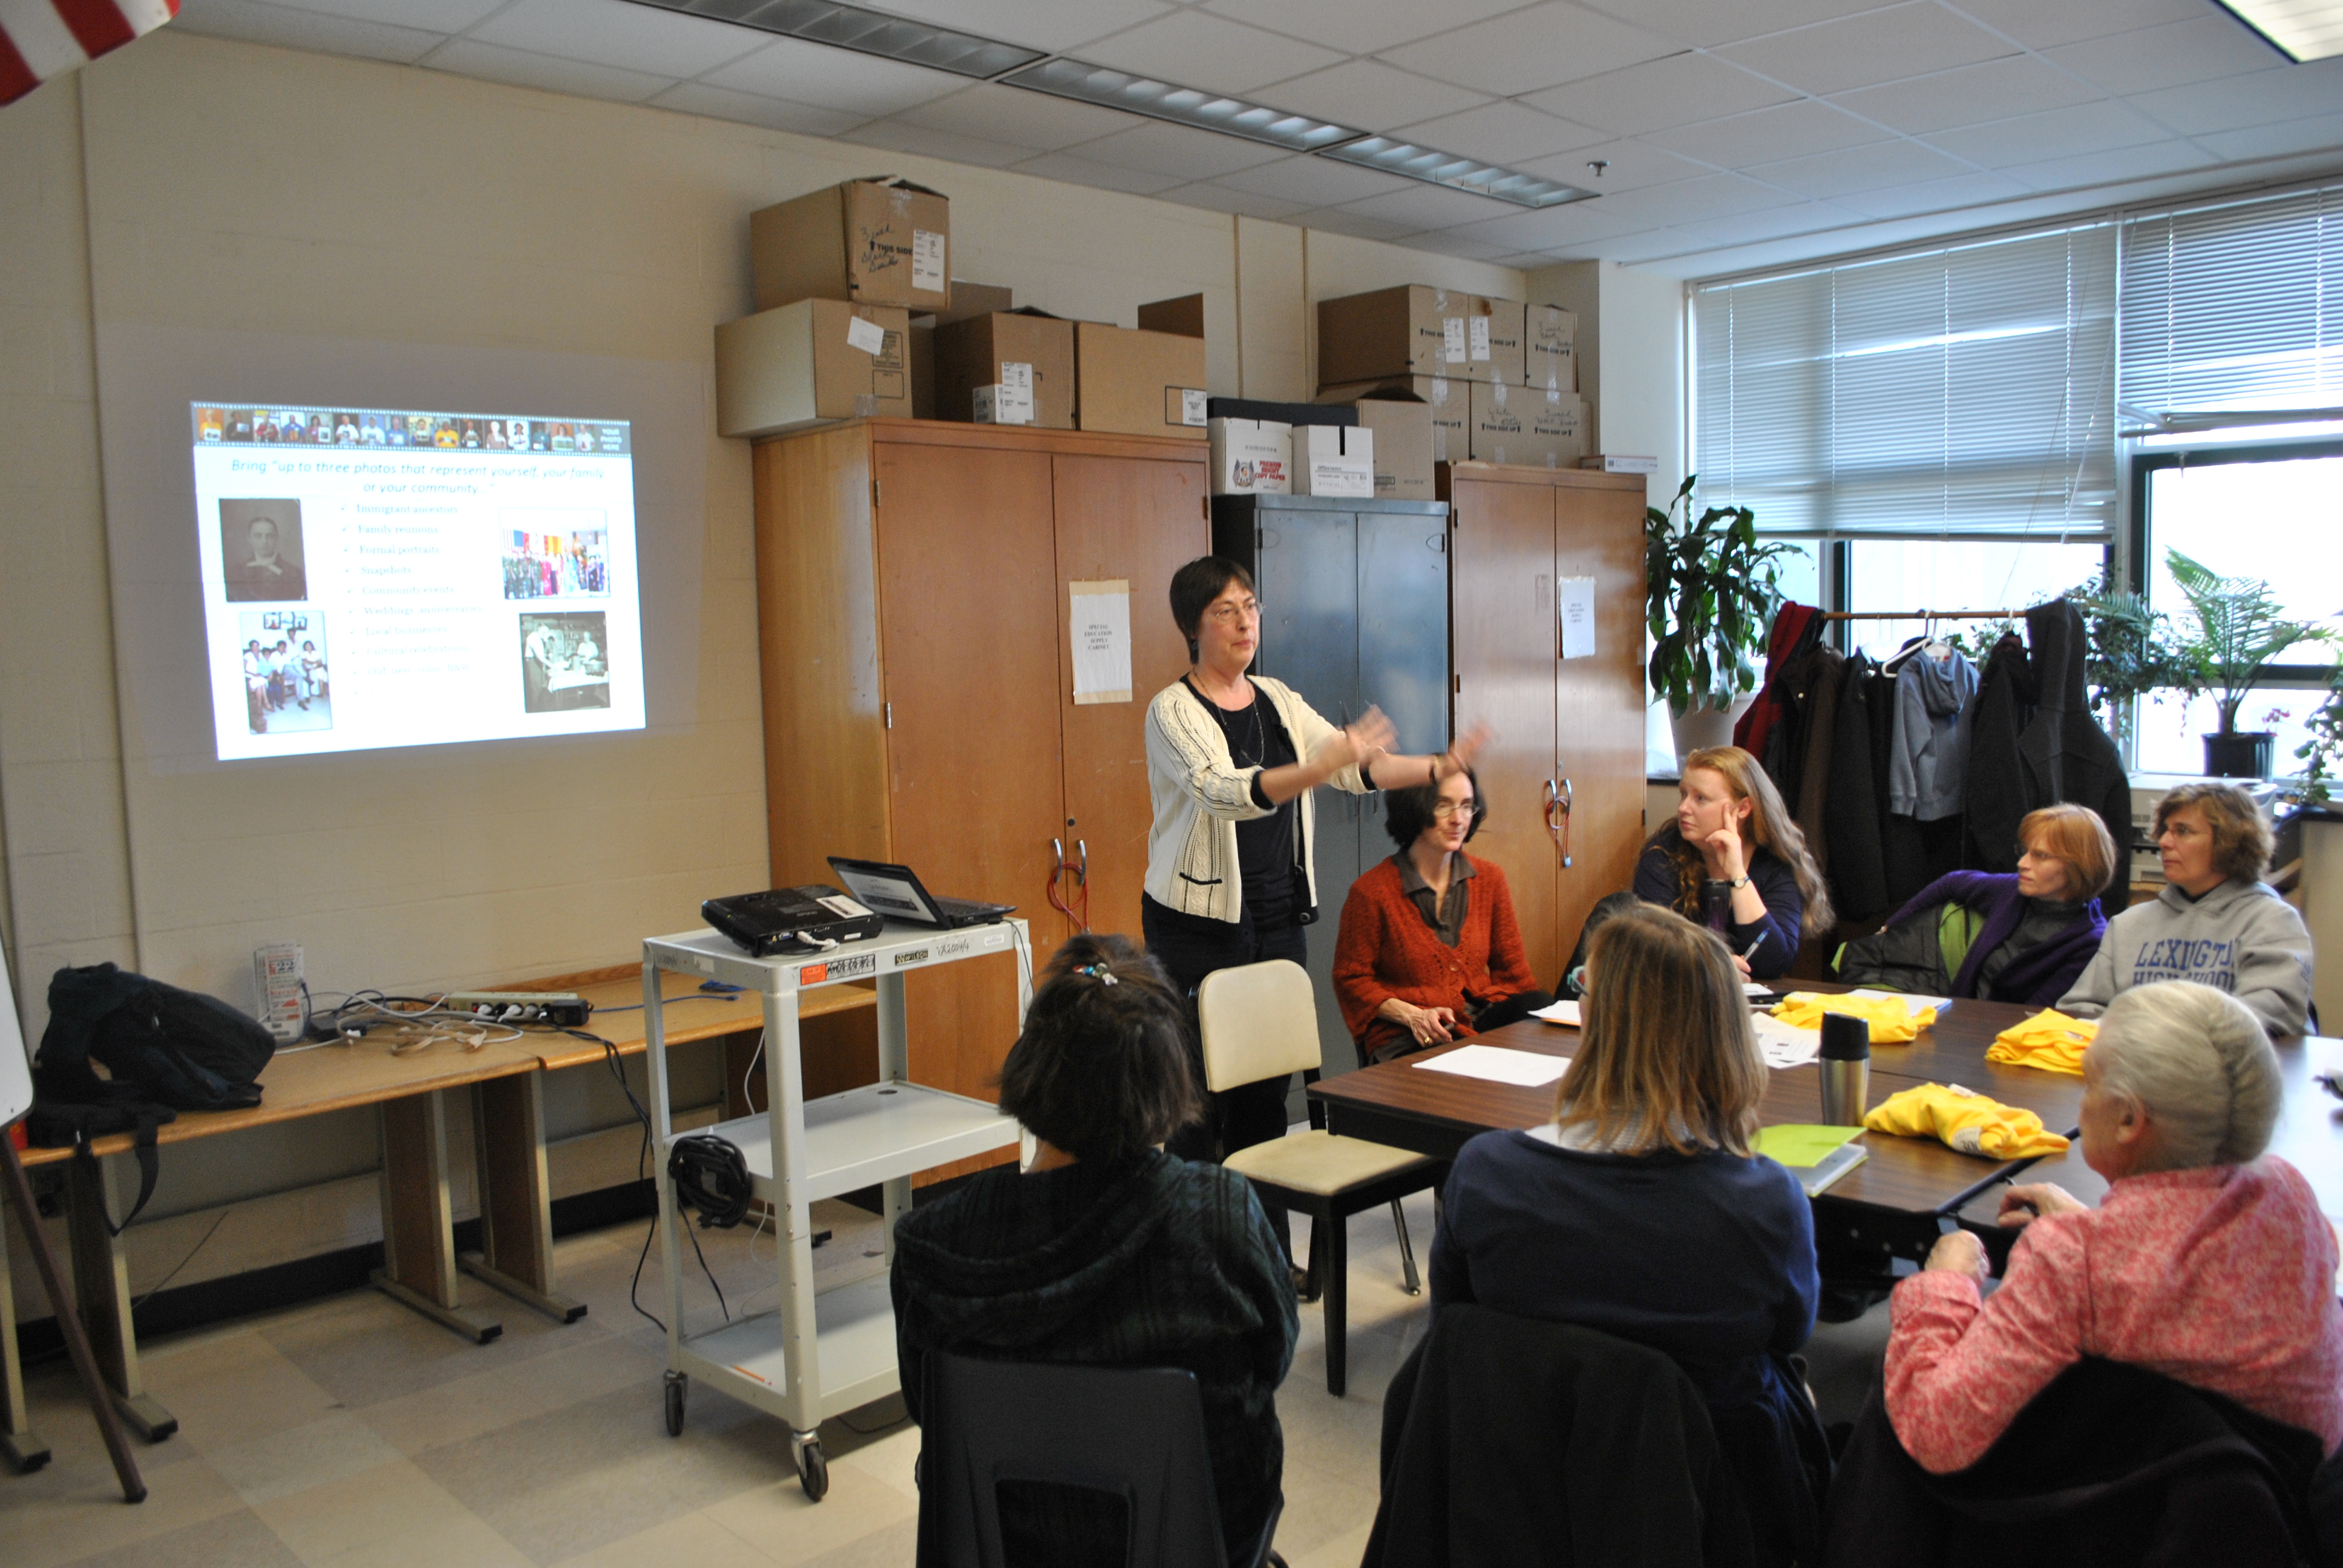
Joanne Riley leads a volunteer training for the Lexington Mass. Memories Road Show, 2013.
The RoPA Developers recommend the Community Coordinator, Event Coordinator, and Collection Coordinator co-host an in-person Event Orientation and Training Session on-site for the Project Team approximately a week in advance of the event. The Event Coordinator will lead these efforts. Holding this session the evening before the event can allow for members of the Project Team to view the space set up prior to the event day. Alternatively, the Event Coordinator may choose to provide Event Orientation and Training through an information packet or virtual meeting.
About a week before the Event Orientation and Training Session, the Event Coordinator will send an email to all event volunteers asking them to preview three resources that will be shared and explained during the Event Orientation and Training Session: the Event Registration and Permission Form video, Descriptive Information Form video, and numbering system handout. Remind volunteers that you will be going over all these materials in detail at the meeting and invite them to bring any questions they may have.
The Event Orientation will provide a general overview to all members of Event Working Group volunteers which will need to include:
- Welcome and introductions;
- Team, event, and collection goals;
- Event day schedule;
- Volunteer plan, including food, breaks, parking, etc.;
- Event floor plan;
- Station and form overviews;
- Numbering system overview; and
- Plans for the collection.
All this information is packaged together in the Event Orientation Slide Deck (download as a PowerPoint file). The Event Coordinator will customize the slide deck with the specifics of your event. Additional notes and suggestions from the RoPA Developers are provided in the speaker notes section of the PowerPoint.
After the Event Orientation, Event Working Group members will rank their preferences for working at the three stations.
During a break before the Training Session, the Community Coordinator, Event Coordinator, and Collection Coordinator will review these preferences and finalize volunteer assignments. When the volunteers return from the break, the three Coordinators will give out assignments and divide everyone into three groups for station-specific training led by the Station Captains.
Training sessions for the Welcome Station Volunteers, Information Station Volunteers, and Copying Station Volunteers are provided in modules Obtaining Permissions, Describing Items, and Copying Items respectively.
STEP 11
Plan for feeding the Project Team.
If you host an in-person Event Orientation and Training meeting, providing food and drink helps volunteers focus on the work of preparing for the event day.
For a day-long event, it’s important to provide breakfast and lunch for the Project Team as they are needed on site all day, or at least in half-day shifts. RoPA Developers recommend providing coffee and morning snacks (donuts, bagels, etc.) for volunteers before opening the event to the public. Lunch (sandwich platter, chips, drinks, etc.) can be set up in a smaller room adjacent to the event space where volunteers can take breaks and nourish themselves according to staggered schedules throughout the day.
For a shorter event (less than 3 hours), you might still want to provide snacks and drinks for volunteers in a break room.
To protect Contributors’ items, RoPA Developers recommend not serving food to Contributors and asking the Project Team to keep food and drink out of the event space.
When planning your menus, remember to keep in mind dietary restrictions and preferences of community members.