Steps to Success: After the Event
STEP 1
Prepare for data entry.
Review data entry handouts and spreadsheets.
To prepare to make the collection available online, the RoPA Developers recommend that the Online Access Specialist and the Data Entry Volunteer carefully reviewing the following documents.
About the Event Registration and Permission Spreadsheet
- Review this handout, which describes the data entry process: Entering Information in the Event Registration and Permission Spreadsheet (download as MS Word or PDF document).
- Download the Event Registration and Permission Spreadsheet (download as an MS Excel file).
About the Descriptive Information Spreadsheet
- Review this handout, which describes the data entry process: Entering Information in the Descriptive Information Spreadsheet (download as MS Word or PDF document).
- Download the Descriptive Information Spreadsheet (download as an MS Excel file).
These handouts will help the Online Access Specialist and the Data Entry Volunteer get comfortable with the data entry process. With these handouts and the information on the Event Hard Drive, you will be able to complete the Event Registration and Permission Spreadsheet and the Descriptive Information Spreadsheet. In completing these spreadsheets, you’re preparing the collection metadata to be uploaded to your online digital repository.
Metadata may sound intimidating, but it’s not difficult to get a handle on. In fact, you’ve already collected most of the metadata you will need to post your collection online. The two handouts will help demystify metadata, which really is just data about data, or information about information.
For example, during your event, when Contributors completed the Event Registration and Permission Forms they provided you with the metadata you need to help ensure you have the permissions necessary to make your digital collection available to the public. And when Contributors completed the Descriptive Information Forms, they provided you with the metadata you will be able to share alongside the Items in your online digital repository.
Digital Preservation Specialist delivers Event Hard Drive to Online Access Specialist.
To begin their post-event work, the Digital Preservation Specialist will need to deliver the Event Hard Drive to the Online Access Specialist and the Data Entry Volunteer. This hard drive will include:
- Digitized copies of all Event Registration and Permission Forms;
- Digitized copies of all Descriptive Information Forms; and
- Production Copies of all digital and digitized Items contributed at your event.
STEP 2
Enter information collected on each Event Registration and Permission Form into the Event Registration and Permission Spreadsheet.
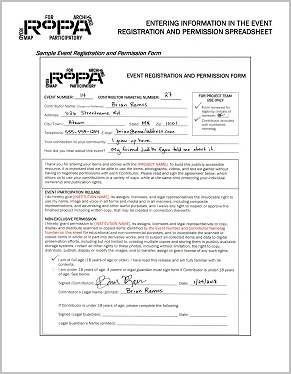
Image of handout describing how to enter information in the Event Registration and Permission Spreadsheet
Once there are digitized copies of the Event Registration and Permission Forms, the Online Access Specialist will notify the Data Entry Volunteer that they can use these copies to complete the corresponding Event Registration and Permission Spreadsheet (download as an MS Excel file). Review the Entering Information in the Event Registration and Permission Spreadsheet handout (download as MS Word or PDF document) describing the Event Registration and Permission Spreadsheet and its connection to the Event Registration and Permission Form.
If your Project Team used an Event Number, the RoPA Developers recommend saving the Event Registration and Permission Spreadsheet using the following file name: eventnumber-event-registration-and-permission-spreadsheet (e.g., 63-event-registration-and-permission-spreadsheet).
Each section of the Event Registration and Permission Spreadsheet directly matches a section of the Event Registration and Permission Form. The spreadsheet will primarily be used to stay in touch with Contributors, to follow up with them should any questions arise about their Items, and to notify them when the collection is available online. There are also two questions that are included on the Event Registration and Permission Form, and the answers to the questions can be used to help the Community Coordinator and the Community Working Group determine how successful they were in reaching the full community. For these reasons, it’s very important that the spreadsheet be as accurate as possible.
Once the Data Entry Volunteer’s work is complete, the Online Access Specialist will review the spreadsheet against the Event Registration and Permission Forms for spelling errors, completeness, and accuracy.
Send a copy of the completed spreadsheet to the Community Coordinator.
After confirming that the data entry work is complete and accurate, the Online Access Specialist will send a copy of the Event Registration and Permission Spreadsheet to the Community Coordinator.
STEP 3
Enter information collected on each Descriptive Information Form into the Descriptive Information Spreadsheet.
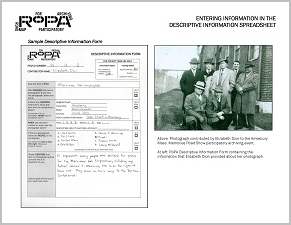
Image of handout describing how to enter information in the Descriptive Information Spreadsheet
Once there are digital copies of the Descriptive Information Forms, the Online Access Specialist will notify the Data Entry Volunteer that they can use these copies to begin to enter the information collected from Contributors into the corresponding Descriptive Information Spreadsheet (download as an MS Excel file). View the Entering Information in the Descriptive Information Spreadsheet handout (download as MS Word or PDF document) describing the Descriptive Information Spreadsheet and its connection to the Descriptive Information Form.
If your Project Team used an Event Number, the RoPA Developers recommend saving the Descriptive Information Spreadsheet using the following file name: eventnumber-descriptive-information-spreadsheet (e.g., 63-descriptive-information-spreadsheet).
It’s important that the spreadsheet be as accurate as possible. Every section of the Descriptive Information Form corresponds to a column in the Descriptive Information Spreadsheet, which in turn corresponds to a data field in your online digital repository. This data connects to a Dublin Core element, which allows the information in your online collection to be easily searchable by researchers, the public, and search engines.
Dublin Core is made up of 15 core metadata elements, which include things like “Title,” “Date,” and “Description.” All of these Dublin Core elements are baked into RoPA’s Descriptive Information Form, which is designed to align with these standards without you having to do any additional work.
To help with the data entry process, the RoPA Developers recommend using the Production Copies provided by the Digital Preservation Specialist on the Event Hard Drive as a reference point. Oftentimes, seeing an image will make it easier to understand what is being described.
Once the Data Entry Volunteer’s work is complete, the Online Access Specialist will review the spreadsheet against the Descriptive Information Forms for spelling errors, completeness, and accuracy. In addition, the Online Access Specialist will flag any Items with copyright concerns for the Collection Coordinator, keeping in mind the takedown policies and rights statement developed in the Before the Event section of this module.
For reference, review the Copyright At Your Event handout (download as MS Word or PDF document), which provides an overview of the kinds of Items people may have contributed, and the permissions- and rights-related questions that might come up.
STEP 4
Confirm there is a unique digital Item associated with each Item in the Descriptive Information Spreadsheet.
The Online Access Specialist will conduct a one-to-one match-up between the Production Copies and the Items listed in the Descriptive Information Spreadsheet.
If you don’t have a perfect match-up, don’t panic. This is sometimes going to happen, even after the most well-run and well-organized events. The important thing is to remain calm and follow the instructions below.
Missing Descriptive Information Form
If there is a production copy that does not have an associated Item record in the Descriptive Information Spreadsheet, notify the Collection Coordinator. The Collection Coordinator will have the original paper copies of the Descriptive Information Forms.
If the Collection Coordinator cannot locate a corresponding form, they will need to reach out to the Contributor to complete a new form. Remember that the second section of the Item ID Number is the Contributor number, also listed on the Event Registration and Permission Form, which has the Contributor’s contact information. Once a new form is completed, the Collection Coordinator will scan it and share a copy with the Online Access Specialist and the Digital Preservation Specialist. These new forms will need to be incorporated into the archived Descriptive Information Forms PDF file in the preservation-copies-f0 folder on the Digital Preservation Hard Drive and will be used to complete the Descriptive Information Spreadsheet.
Missing Production Copy
If there is an Item record in the Descriptive Information Spreadsheet that doesn’t have an associated production copy, notify the Collection Coordinator. The Collection Coordinator will need to reach out to the original Contributor to get a digital copy of the Item.
When (and if) a digital file is provided by the Contributor, the Collection Coordinator will share that file with the Digital Preservation Specialist, who will in turn create both a preservation copy and a production copy of the file. The Digital Preservation Specialist will share the production copy with the Online Access Specialist.
Once there is a one-to-one match-up, your collection is ready for upload!
STEP 5
Send copies of the completed spreadsheets to the Digital Preservation Specialist for preservation.
After the data entry work, review, and one-to-one match-up is complete, the Online Access Specialist will send the completed, final Event Registration and Permissions Spreadsheet and the Descriptive Information Spreadsheet to the Digital Preservation Specialist.
STEP 6
Post the collection online.
Depending on the online digital repository your Project Team chose, the Online Access Specialist is now ready to put the collection online. Different platforms, different vendors, and different partners will have different requirements, but the Dublin Core structure of the metadata that you employed using the Descriptive Information Spreadsheet is a strong standard that can be used across any number of repository platforms.
STEP 7
After your collection is posted to the digital repository, share the link to the collection with the Community Coordinator.
Now that your collection is available online, it’s time to let everyone know! Send the collection link to the Collection Coordinator and Community Coordinator, who will notify Contributors, researchers, and the public that the collection is available for use.